Friday, 30 June 2023

Sanding down the hull and bottom of the Picnic boat to get it ready to re-paint and fitting of the skeg

The first run of sanding to get rid of the year's of paint on the hull and bottom to get it back to the base gelcoat


The port side almost done apart from the aft end which is under the wheelhouse we are working on.


The starboard side which is going to get the same treatment as the port side and get rid of the old paint


Thursday, 29 June 2023

Old paint removal and getting ready to refit the new windows in the Hardy Bosun

Now that Picnic boat is turned over it is time to remove all the old antifouling paint off the bottom and do the underwater repairs to the hull and build the stern tube skeg to encapsulate the stern tube. 


Most of the paint was able to be removed by scraping off the loose paint and the rest will have to be sanded off using a sander with dust extraction to keep down the levels of dust in the air.


The Hardy Bosun windows will be clearer job than the antifouling paint removal apart from the sealant used to bed them on with and the mess that comes with new sealant. 


The wheelhouse  windows will be a reasonably easier and  cleaner job has it is a a good working height and not on the boat. 


Wednesday, 14 June 2023

First stage of doing the gelcoat repairs on the wheelhouse of the Hardy Bosun

While the wheelhouse is removed from the superstructure of the boat it gives the team time to do the gelcoat repairs needed to be done on the wheelhouse at a safe work level.

Especially this complex stargaze on the wheelhouse roof which needed careful work doing on it.


There were a number of different gelcoat repairs to be done in different places around the roof and the sides of the wheelhouse  


Some of the gelcoat repairs are going to be easier to do than others given the position of the repairs and the thickness of the gelcoat in these areas 


The edges are always the places that get damaged easily as these places are thin and very flexible  


The corners are another place that as a problem is caused by being flexible


Another area that gets often the need to be repaired is where fittings have been changed over the years as the canopy gets renewed and new fittings are moved leaving old fixing holes. 


Starboard rubbing strake now back in place just a small amount of fairing and then screw holes need plugging with hardwood plugs and then varnishing

The new rubbing strake glued back in position, then when the glue as cured then a final fairing to match the original forward section and then varnish the whole of the rubbing strake.


Just needs a final profiling and the same to be done on the port side 


As requested the water channel between the two halves to let the water flow out of the scuppers and overboard and not held up in the rope fender or the rubbing strake as this rubbing strake was designed before.


Just the end of the rubbing strake to profile when the glue as cured off.


Friday, 9 June 2023

Shaping winch bases and then ensuring they can be used with the guard wires in position

First job was to angle the bases so that they were the correct angle to be inline with the genoa cars


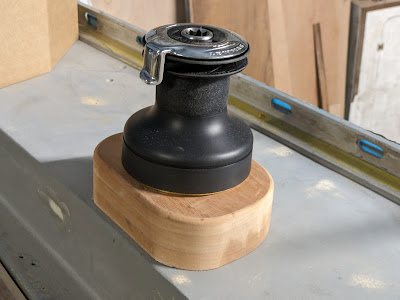
Cut curves on the ends to ensure no hard corners to caught sheets and other lines. The bases are longer to ensure there is a large footprint to spread the load.


The temporary line run through the genoa car shows the angle is correct to load up the winch.


This photo shows the winch handle can be used through its full sweep 


This photo shows that a person with full foul weather gear can use the winch


Just got to get the bolts ordered and epoxy the bases and these can get fitted to the boat.


Thursday, 8 June 2023

Redesigning the winch bases and making new hardwood bases which will be lower and make winching the sheets easier.

The original height of the winches were governed by the height of the cockpit coamings and now that the coamings are going to be shorter and lower then the height of th winch bases can be reduced to a more easily used height and the winch handle will not get in the way of the guard wires as they did before.   


The angle to the genoa car will be maintained just that the height of the hardwood base blocks will be half the height as before and so make winching easier.


The new hardwood bases being glued together with epoxy glue and once they are cured then the shaping will start with getting the angle correct withe genoa car


The old brackets will be kept to take the angles off the tops so that we can maintain the correct angle with the genoa cars when they are in the different position as the genoa cars are moved depending on the sail set on the boat. 


Wednesday, 7 June 2023

Gluing and sealing the inner starboard rubbing strake and dry fitting the port side rubbing strake

Having dry fitted the starboard inner rubbing strake, it was time to then glue the scarph joint and then put the sealant on the back face of the rubbing strake to seal the fixing holes where the bolts which hold the inner section of the rubbing strake in position.  


With the aid of a couple of sash clamps which ensured the rubbing strake was fitted under the blue stripe and along the hull.


This time the rubbing strake is fitted with a good sized machine screw and penny washers to spread the weight larger area and ensure the rubbing strake sit on the hull along it length of the new rubbing strake.


The port side now dry fitted and all the holes drilled to take the penny washers and machine screws when it is fitted in the same manner as the starboard side 


The sash clamps in position to ensure the rubbing strake are in the correct position.


Thursday, 1 June 2023

Fitting the rubbing strake to the starboard side

After hanging round and sorting out the correct length it was taken apart so that the inner parts was able to be steamed to the shape of the hull.


Once that was done then the holes were drilled through the inner section was counter bored to take a penny washer and a nyloc nut to the fix the inner part in position and then the outer part will be fixed on after.


Then the rest of the holes were counterbored ready to fix the inner section once all the work is done on the forward end of the rubbing strake


Another job which as been underway while the fender was being done was the polishing of the blue stripe.


A close up of how the rubbing strake is going to fixed in position once the rest of the work is done on the rubbing strake


The shie is coming back to the blue stripe just a bit more compounding and polishing to come before it is ready.